
Phone: 360-770-3801 info@finenscale.com
 |
Modeling Tips
FNM-565 Steel Coils (24 PER PKG) - 9.95
If you do a web search for steel coil images you will find hundreds of photos of the manufacture, handling, and transportation of steel coils. Notice the color of the material, and most importantly, how they are strapped, chained, blocked, and cabled down for shipment by various modes of transit.
FNM-510 Wooden Crates
Pretty easy to get these on the layout. First check the bottoms and clean off any residual flash. Next, brush on a thin (95% thinner) mix of FloQuil Roof Brown, or whatevers close and handy. Stick them to a piece of cardboard with double-sided Scotch tape makes this a lot easier. Finally, for large crates or stacks of smaller crates, glue 2 X 4 skids underneath.
FNM-590 Stacks O Sacks O Stuff
Brush a medium to light brown on the pallets, then gray, yellow, green, or whatever you choose on the sacks. On the samples in the photo, we clipped small, usually unreadable bits from leftover decal sheets, then clear coated and followed up with a very thin wash of dark gray to accent detail. A final coat of Testors Dullcoat wraps up the painting. Individual bags can be heated and bent to stand up against a pallet, or laid on top of a partial pallet.
FNA-3611 Eco-Blocks
First step, clip the little sprue from the end of the full and half-blocks. This doesnt have to be too neat as these blocks are set with gaps between them. Its easiest to paint and weather before installation, so put them on cardboard with double-sided Scotch tape. Paint with Floquil concrete and follow with thin washes and/or chalk. Dab some rust or dark brown on the lift ring. Streaks of rust from the lift ring happens,, but do it sparingly as not all blocks look the same. Finish with a light spray of Dullcoat.
FNA-3612 Loading Docks
If youre butting the docks together, remove the overhanging lip where necessary. Then, check for height. Docks are pretty standard, but if you need it higher, add sheet styrene to the bottom as needed. As with the Eco-Blocks, paint with Floquil concrete and follow with washes and chalk. Drag a dark brown or dark gray over the top and ramp to simulate forklift tire marks including some donuts where the forklift will make a u-turn. Parking bumpers and traffic cones are used for safety and keep workers and lift drivers aware of the edges. Bond them to cardboard with double-stick tape and paint the cones orange. Any shade will do as these things get run over and pretty beat up. Black on the bottom edge and a dab of white on top and theyre ready to go.
Assembling and Finishing Cars N Scale
Start by dragging the car bottom and back side of the wheels across a piece of sandpaper. Remove any remaining flash with a hobby knife. As with any resin casting, rough up any areas to be glued, in this case the back of the wheel and the wheel well on the body casting. Any type of super glue will work just fine for assembly.
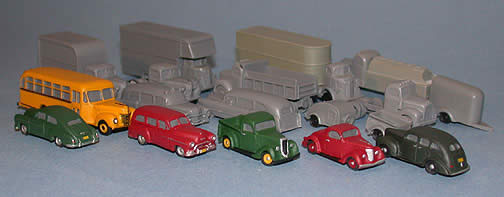
Its much easier to paint and detail before gluing on the wheels, so lets get on with the paint work.
If youre not old enough to remember, there werent any fancy
paint jobs back then. Well, at least not from the Ford or
Chevrolet factory. Black, maroon, dark green, light and dark gray
were probably the most common. I guess a yellow or red car showed
up once in awhile. Anyway, stick with simple colors. Resin will
accept any kind of model paint, but wash the castings with soap
and warm water to remove any mold-release residue that might
interfere with the paint, then spray on whatever color you want
for the body. (I drilled a couple holes in the bottom to hold it
with tweezers while painting.) When dry, spray with Testors
GlossCoat. A couple coats so you get a hard, shiny surface will
do.
I suggest a medium gray for the windows. Black, silver, or white
dont quite look right. Dont know why, they just dont. Now,
brushing all those windows neatly may seem daunting, but relax and
read on. Use a water-base paint and keep a damp cloth handy. Paint
a window, then wipe off any excess with the cloth. The previous
coat of Gloss finish will let you wipe it off cleanly.
For bumpers and chrome trim, I prefer ScaleCoat silver, but use whatevers handy in your paint box. A fine brush, lightly loaded with paint, dragged on its side over chrome strips works well for me. If you get an ugly blob, uhmmm, that side goes away from the audience. Were practical here.
A dab of silver in each headlight, and a touch of red on the tail light works great. And, a little color on the license plate is a nice touch.
Wheels were usually painted the same color as the car body fitted with small hubcaps and chrome trim rings around the edge, and sometimes full chrome wheel covers. Paint whatever combination you want on each wheel. No need to paint the tire, as its already black.
Next, glue each wheel in place, noting that you have room to mount the front wheels in a turning position if you want. On the subject of wheels, I find a lot of model cars sit way too high and these are no exception, so I trimmed a little off the top as necessary to get them a little farther up into the wheel well. The 54 Cad Hearse/Ambulance and the 62 Corvette need special attention to ride height.
Once the wheels are in and secure, gently drag the car over a piece of flat sandpaper. There are two reasons for this. First, its hard to get all four wheels touching the ground evenly. Second, on real cars the bottom of the tire is flat to the pavement. Sanding the bottom flat grounds the car making it much more convincing, even at a distance.
Finally, spray the whole thing with Testors DullCoat. I still dont know why, but stuff thats left shiny just looks toylike.
Thats it. Hope you like em. Happy modeling!
Random observations on caboose interiors
We made these to fit the new factory-glazed M/T caboose. The glazing is a clear molding that lines the caboose walls. Its about 30-thousandths thick, and the interior is a press-fit to the inside. Of course they will fit earlier models even if youve glazed them with clear acetate.
Additionally, they are made to accommodate a Richmond Controls lighting module which sticks to the caboose roof. The C-30 caboose, among others, had a wooden toolbox mounted to the underframe oppsite the large air reservoir tank. The tool box included in our kit is notched to locate and fit around the crossbeams.
If youre using some other form of interior light that doesnt use a circuit board, the cupola seats can be split off the center panel so a faint light will shine up into the cupola area.
What about color? Early builders photos look like the interior
was natural wood varnished. Im only guessing that cushions were
probably black or green leather.
George has information that somewhere in the forties interiors
were painted a light green. Id also guess that cushions were then
made of a green naugahyde.
For the really persnickity among us, a piece of round styrene can be glued to the back of the pot-belly stove and it will line up pretty well with the roof stack.
Hope you have fun with this!
Copyright 2002-2020 Fine N-Scale Products